The Optimal Configuration for Using the InvisaGig Cellular Modem with pfSense: An Overview
The Solution to Streamlining pfSense Settings When Using InvisaGig as WAN

While your InvisaGig should be ‘plug and play’ when using it as WAN under pfSense in most cases, there are some settings that can be tuned to achieve the fastest, most stable connection.

Assumptions, Requirements, & Limitations
- This guide assumes you already possess some networking knowledge and familiarity with terminology such as ‘IP address’, ‘auto-negotiation’, ‘DHCP’, ‘NIC’, etc.
- It is assumed you have already installed pfSense (CE v2.5.2+, or Plus 21.02+) on bare metal hardware acting as a router/firewall with a basic LAN and WAN interfaces configured.
Best Practice Configuration Settings for pfSense

Speed and Duplex
When running pfSense on a Netgate 4200 or similar hardware that supports 2.5Gbps WAN, your WAN interface may only auto-negotiate a 1Gbps link. To achieve a 2.5Gbps link, you may need to manually set the ‘Speed & Duplex’ property of the WAN interface your InvisaGig is connected to, to ‘2500Base-T’. This setting can be found in the pfSense web interface by navigating to ‘Interfaces > WAN’ (where ‘WAN’ is the interface that your InvisaGig is connected to):
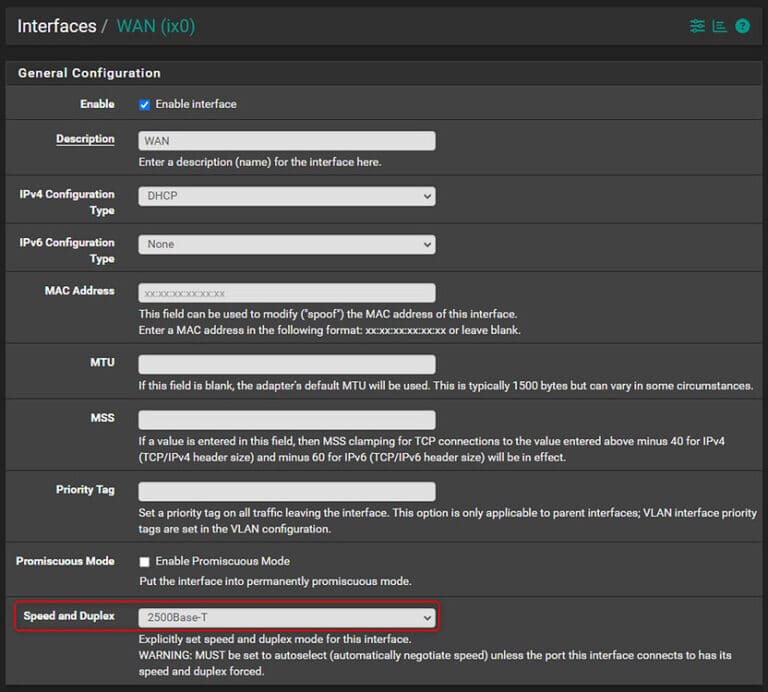
Once set, you will need to ‘Save’ and ‘Apply changes’ for the new link speed to take effect. NOTE: Ultimately, the throughput of your Internet connection on the WAN will depend on the throughput of the cellular carrier connection.
Flow Control

When setting ‘Speed and Duplex’ of your WAN to ‘2500Base-T’ you may notice that the interface reports ‘<full-duplex,rxpause,txpause>’. This indicates that Flow Control is enabled. Outside of very specific circumstances, Flow Control may introduce some latency, so it is recommended to disable it. To disable Flow Control, SSH into your pfSense install and select option #8 for Shell access; execute the following command and reboot:
echo ‘hw.ix.flow_control=“0”’ > /boot/loader.conf.local
Once rebooted, you should see that the WAN interface now simply reports ‘’:


IP Passthrough MAC Address
If you have the default Bridge Mode (IP Passthrough) enabled, you may notice that when the carrier connection drops and reconnects it takes some time for the WAN under pfSense to re-establish a connection or receive an IP address. This can be due to auto-detection of the WAN interface MAC address by the InvisaGig which is used to pass the IP through to the WAN once connected to the carrier. You can improve this behavior by setting the IP Passthrough MAC manually in the InvisaGig configuration.
To set the MAC statically under InvisaGig v1.0.12+, login to the Main Menu then navigate to ‘Connection Configuration > Local IP & Multiple Modem Setup’. Enter ‘y’ to proceed, select or enter the desired local IP for the InvisaGig, enter ‘y’ to enable IP Passthrough, enter the MAC address of your pfSense WAN interface, then enter ‘y’ to reboot and apply the change:

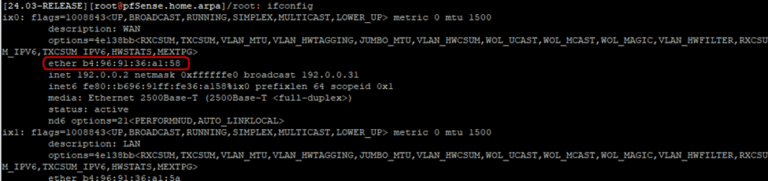
NOTE: You can obtain your WAN interface MAC by connecting to your pfSense over SSH and selecting #8 to access the Shell. Entering the ‘ifconfig’ will display the MAC address of each interface including the WAN:
Gateway Monitor IP

Another recommended tuning if you are using the default Bridge Mode (IP Passthrough) of the InvisaGig, is to statically set the ‘Monitor IP’ of the WAN Gateway. By default, this gateway is named ‘WAN_DHCP’ found under ‘System > Routing > Gateways’. Clicking the ‘pencil’ icon next to this gateway to edit its properties, it is recommended to enter the local IP address of the InvisaGig (the IP you access the configuration interface from) as the ‘Monitor IP’. This is because the passthrough address can go offline at times temporarily during carrier reconnections which may cause the gateway monitor to view the InvisaGig gateway as ‘down’ for a period longer than it really is offline. Setting the ‘Monitor IP’ statically in this way avoids the issue. ‘Save’ and ‘Apply changes’ for the change to take effect:


Firewall Maximum Table Entries
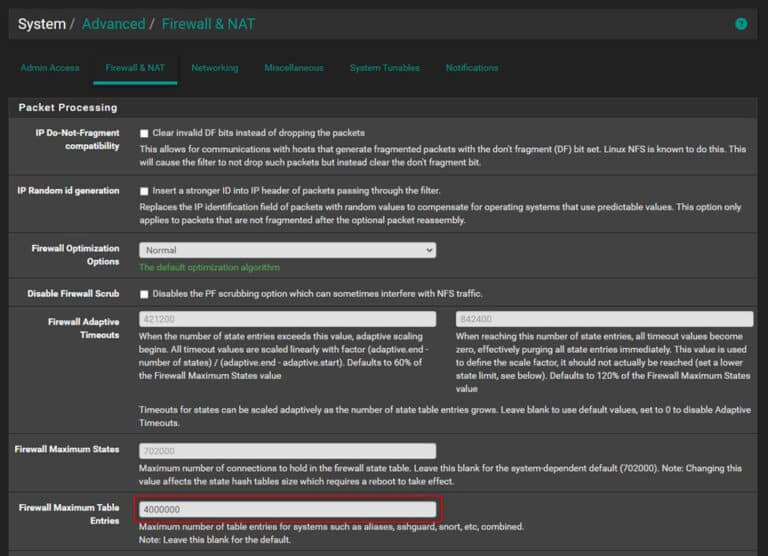
By default, pfSense caps the maximum number of firewall table entries at 400,000. While this seems like a large number, busy networks with lots of devices can easily stack up significantly more than this leading to strange behavior where traffic seems to stop flowing or URL aliases (which update at a regular interval) fail to update properly once you hit the limit.
Practical examples of the kinds of errors you might see are error messages when logging into the pfSense web interface stating that URL aliases failed to update, automatic configuration backups failed, or IoT devices saying they cannot reach the Internet. To prevent this, it is typically recommended to set ‘System > Advanced > Firewall & NAT > Firewall Maximum Table Entries’ to at least 2,000,000 or higher. Provided you have a healthy amount of RAM available, I prefer using a value of at least 4,000,000 to allow ample overhead.
Questions About Optimizing Your pfSense Settings for the InvisaGig Cellular Modem Using WAN?
For an extensive archive of knowledge base articles, including the ability to comment on this article, visit the InvisaGig forums!