Enhance & Protect Your Internet Experience Using ControlD & pfSense: An Overview
Unexpected IP Address Issues Created by Using a Cellular Connection to Access the Internet

Using a cellular access device like InvisaGig to connect to the Internet is fast and convenient. However, since most cellular plans use shared IP addresses or addresses from a common pool across each carrier sometimes this may cause unexpected issues when accessing certain websites or services. For example, you may have encountered:
- 429’ or similar errors from AI services such as ChatGPT, Claude, etc.
- Repeated security tests or puzzle prompts (CAPTCHA) when searching with Google, accessing online banking, booking a flight, grocery shopping, etc.
- Error messages with certain services indicating you have ‘exceeded your limit’ for daily access from your device.
Additionally, or separately, you want to ensure your family is kept safe from accidental malware infection, inappropriate advertising, scam sites, and/or age-inappropriate content. Your previous wireline ISP may have bundled or directly offered filtering of this undesired content, which is no longer the case when you switch to a cellular ISP.
The ControlD Solution
ControlD is a powerful, low cost, customizable DNS service that can not only help avoid cellular IP issues but can also protect your network from unwanted sharing of personal data, block access to malicious websites, prevent access of undesirable content, and more using an intuitive web portal.
On its own ControlD can be used directly with almost any device but is even more convenient and powerful when you combine it with pfSense as the local router/firewall for your network.
Assumptions, Requirements, & Limitations Before Getting Started with ControlD as a DNS service

- This guide assumes you already possess some networking knowledge and familiarity with terminology such as ‘IP address’, ‘MAC address’, ‘DNS’, ‘proxy’, etc.
- For installing ControlD as a DNS service on your router is assumed you have already installed pfSense (CE v2.5.2+, or Plus 21.02+) on bare metal hardware acting as a router/firewall with a basic LAN and WAN interfaces configured. ControlD supports other router brands as well but this tutorial will focus on its pfSense integration.
- This guide assumes the default pfSense LAN IP is the default ‘192.168.1.1’. If this isn’t the case, you will need to update any references to this IP with your actual pfSense IP address.
- This guide will be using ControlD as our only DNS resolver. If you wish to still use a local DNS server in combination with ControlD (i.e. custom upstream, ‘Split Horizon’, etc.) then you should refer the ControlD ‘pfSense and OPNsense Operations Guide’ and/or this article from their Blog.
ControlD Setup & Configuration

Choosing Your ControlD Plan
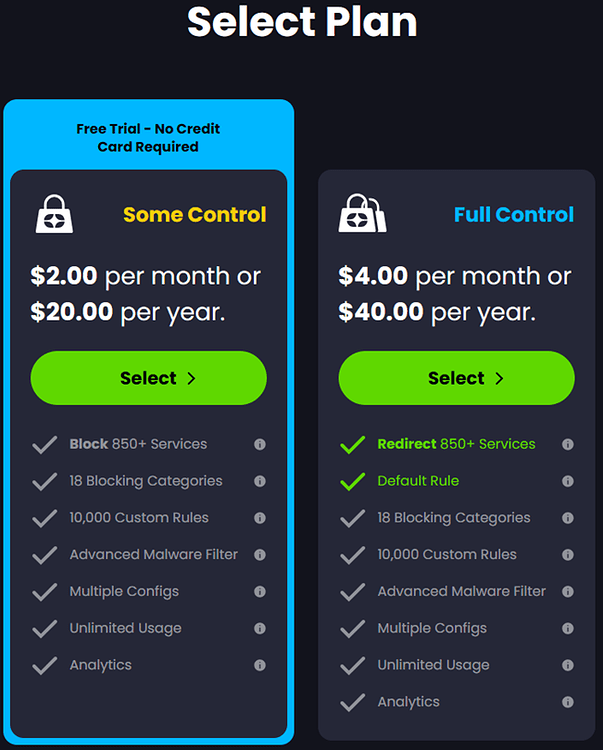
ControlD offers two plans as of September, 2024: ‘Some Control’ and ‘Full Control’. The former can help filter ads and control access to undesired websites but lacks the ‘redirect’ feature that can help avoid website errors due to common or shared IP addressing from the cellular provider. So, choosing ‘Full Control’ is recommended if you would like to implement the full solution as covered here. As of this writing, InvisaGig has no business or personal partnership with ControlD, we just think they have a great product and enjoy using it personally.
Create a Profile in the ControlD Dashboard

From the ControlD dashboard, select ‘Profiles’ and click ‘+’ to add a new profile. When adding a new profile you can use the default ‘Custom’ template to select all options manually, or you can select one of the preset options which might be most appropriate for your purposes:
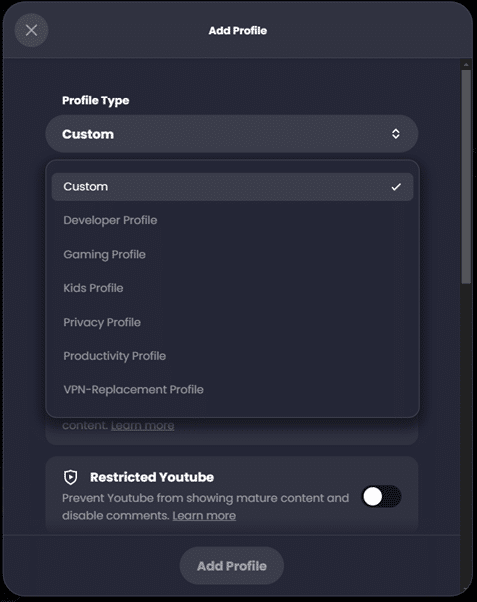
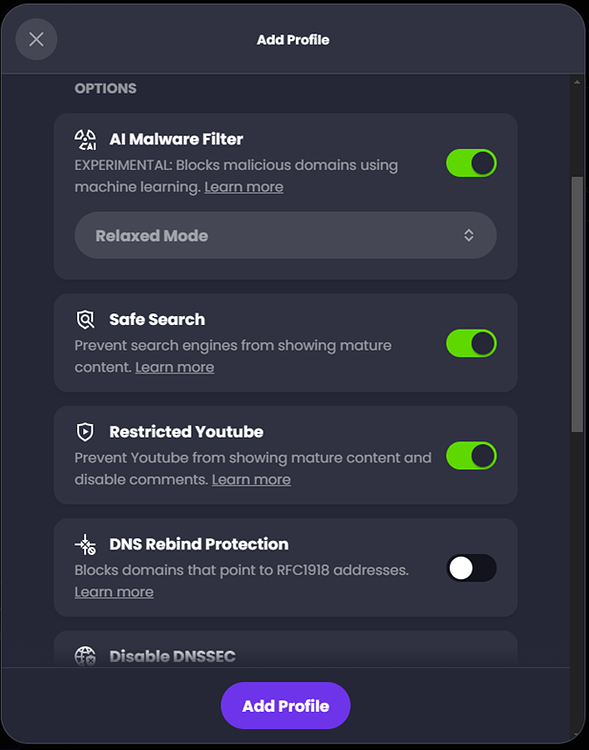
For this example, I will keep the ‘Custom’ option to select all my own settings and enter ‘pfSense Default’ as the ‘Profile Name’. For my scenario, I want to create a default profile to use with any devices that connect to the Internet via my local LAN. For this profile I want to enable AI Malware Filter, Safe Search, and Restricted YouTube so that any devices my family connect to the network have some basic protections automatically set:

Edit a Profile in the ControlD Interface
Once you click on ‘Add Profile’, you will be taken to the ‘Profiles’ list, from there you can find your added profile and click on ‘Edit’ to refine it further:
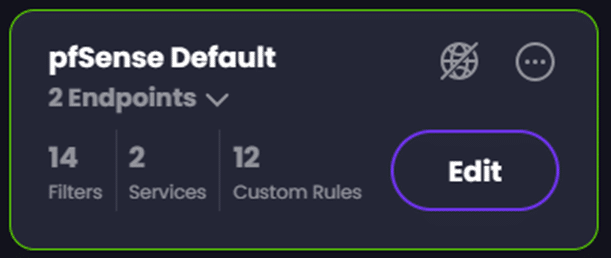
In the ‘Edit’ view you will have a dropdown that includes groups of configurable settings for your profile: Filters, Services, Custom Rules, and Profile Options.
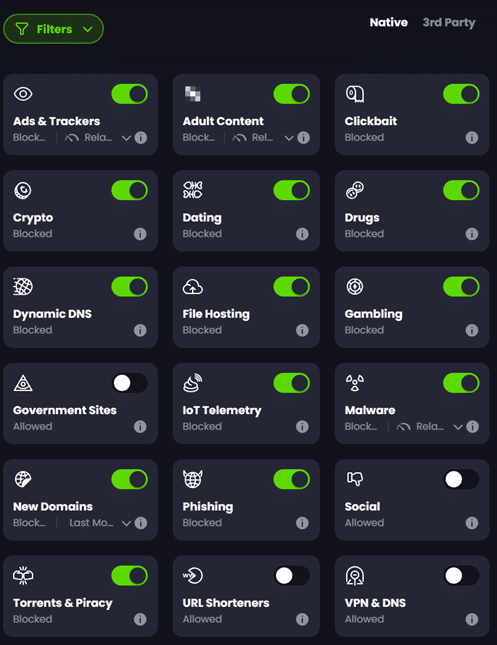
Using Filters to Toggle ControlD Blocklists

Under ‘Filters’ we can toggle ControlD native blocklists and third party blocklists as desired. Blocklists are collections of website domains that belong to a certain category that we may not want our connected clients to access. Since ControlD will be our DNS resolver, any attempt by LAN clients to access sites on these blocklists will be blocked.
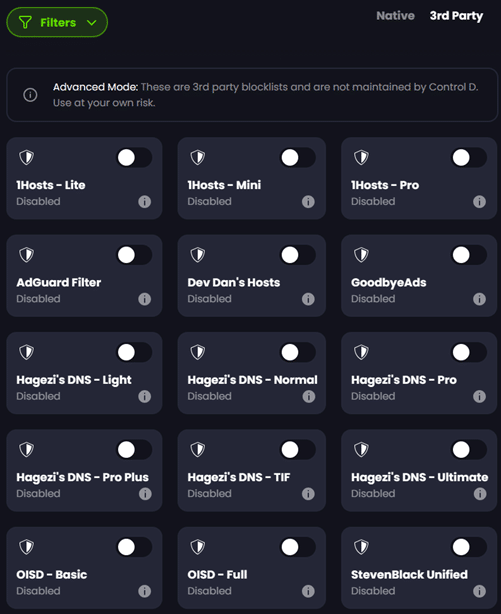
The native ControlD ‘Filters’ are very powerful in blocking most undesired and malicious content, but if you want further protection, you can also enable third party lists as well. If you’ve used PiHole, AdGuard, or similar you will likely be familiar with many of them.

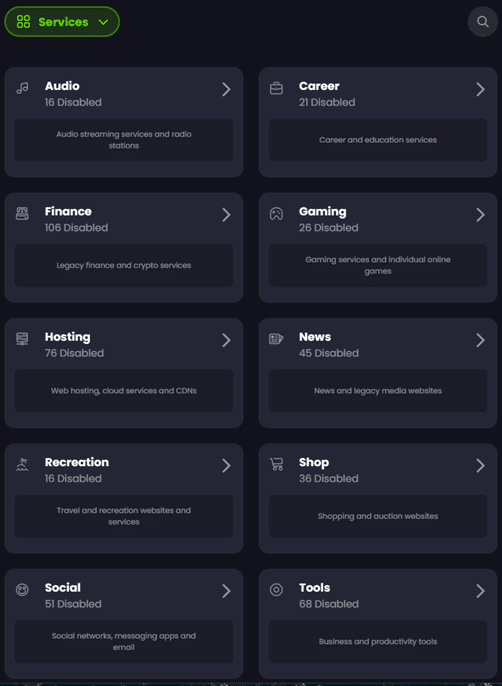
Services: Enabling and Disabling Collections of Domains in ControlD
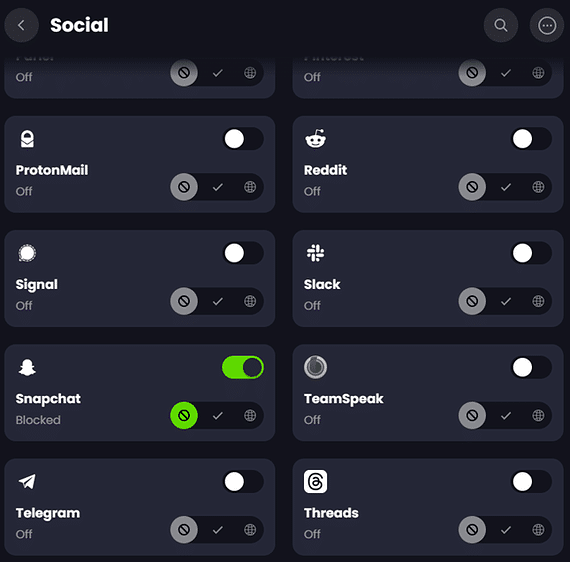
‘Services’ are collections of domains grouped together by common categories that you can easily enable or disable as desired. For example, I didn’t want to enable the Filter for blocking every social media site, but I don’t want any devices accessing Snapchat specifically. So, I can select the ‘Social’ category under ‘Services’ and just block all known Snapchat domains which effectively kills access to both Snapchat Web and App.
Using Custom Rules in ControlD

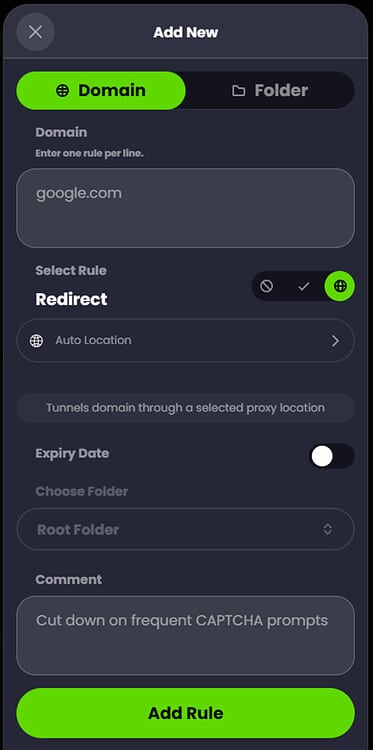
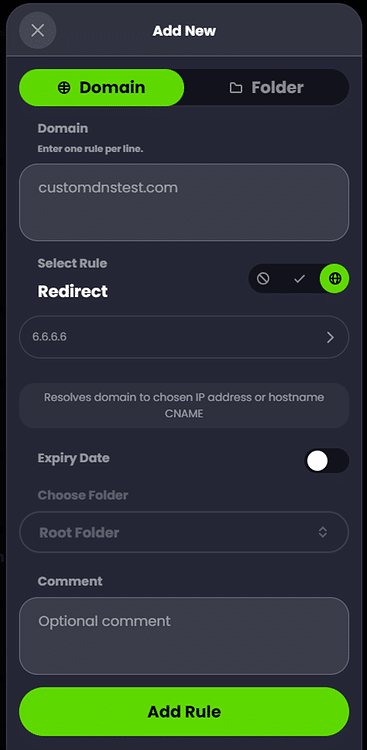
‘Custom Rules’ allow you to define additional, domain-specific behaviors that may not be covered by either ‘Filters’ or ‘Services’. For example, I frequently receive CAPTCHA prompts when accessing the google.com homepage for web searches due to my native IP address being detected by google as one with a cellular range that typically receives a lot of traffic from bots. These CAPTCHAs are time-consuming and annoying so I would like to avoid them any time I access google.com.
To make this happen I can add a ‘Redirect’ rule for ‘google.com’ which tunnels all access to that domain through a proxy located at a specific regional location. I chose ‘Auto Location’ since that will automatically choose a geo-local IP with the best latency. Since this proxy IP is used to access google.com instead of my cellular IP, I no longer receive the frequent CAPTCHA prompts to prove that I am a human:

Note: In testing this rule I found it was creating issues with google.com subdomains for Google Voice calling, so I added an additional ‘Bypass’ rule specifically for ‘stun.l.google.com’ which exempts this child domain (used by Google Voice to place phone calls) from being proxied and thus uses my native IP address:

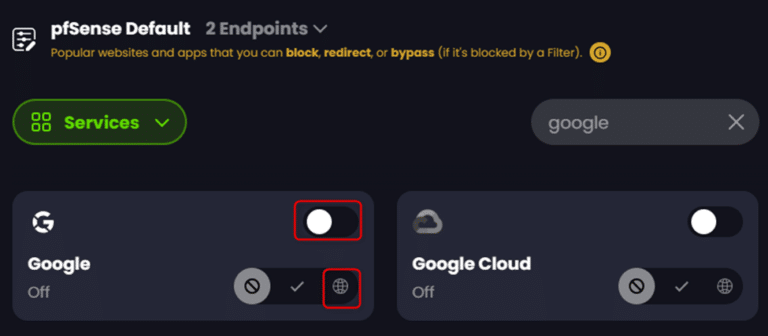
As an alternative to setting ‘Custom Rules’ for google.com its child domains, you could test enabling a regional ‘Redirect’ in the same way for all Google services using the ‘Google’ category under ‘Services’:

ControlD Profile Options
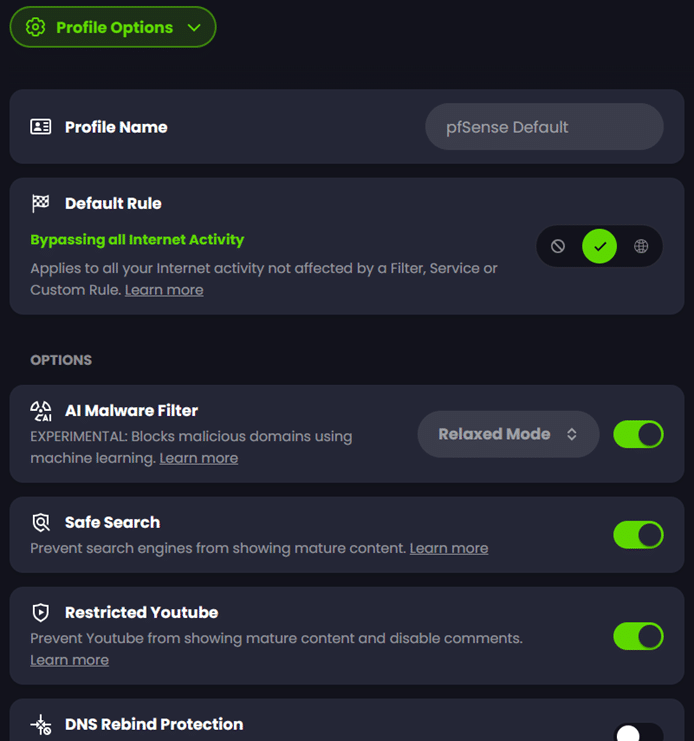
‘Profile Options’ are a collection of overarching defaults that apply to policy traffic regardless of the other policy settings. The most important of these is the ‘Default Rule’ which determines what happens to traffic not explicitly affected by any of your selected rules. This can be set to ‘Block’, ‘Bypass’, or ‘Redirect’ just like when you create rules. In this example I take a permissive approach by setting it to ‘Bypass’ which lets all traffic through to the original destination unless it is otherwise affected by any of my selected rules.
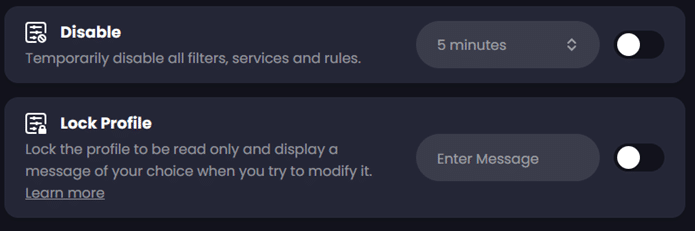
This is also where you can toggle the options for ‘AI Malware Filter’, ‘Safe Search’, ‘Restricted YouTube’, etc. that you selected when first creating a policy. You also have options for time-bound disablement of the profile and locking of the profile for testing scenarios and security:
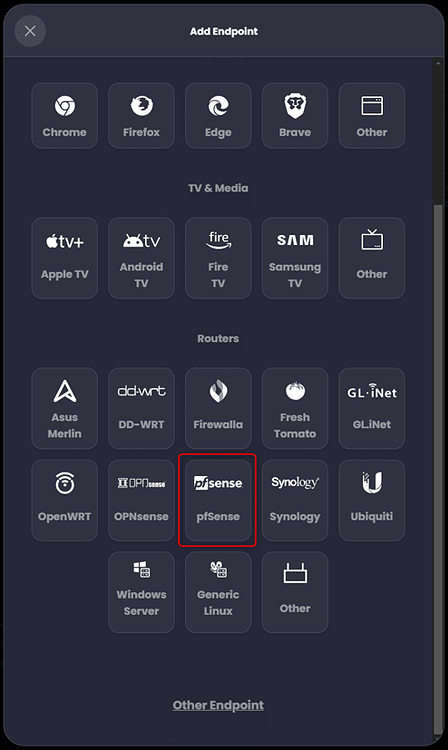
Endpoint Creation in ControlD

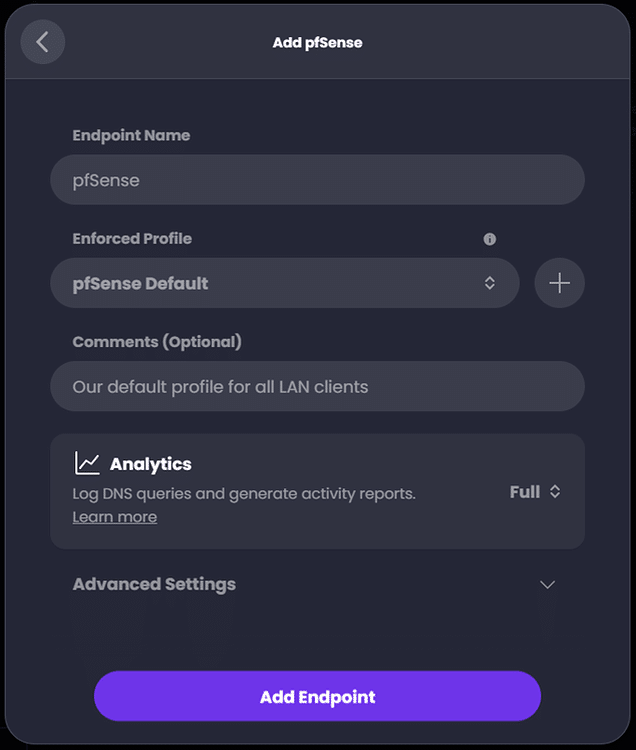
‘Endpoints’ allow you to enforce specific policies for specific devices. For now, we will just configure a single endpoint for our pfSense router/firewall and assign it the ‘pfSense Default’ profile that we already created. Once we configure pfSense to use ControlD we can add additional endpoints from LAN clients which are discovered and assign them to additional, alternative policies as needed.
We can also add individual endpoints for each of my family’s cell phones later and bind them to policies as well to ensure that the same site restrictions are enforced no matter if the phones are at home on Wi-Fi or using their own cellular data connections. For now, we will proceed with adding or pfSense endpoint:

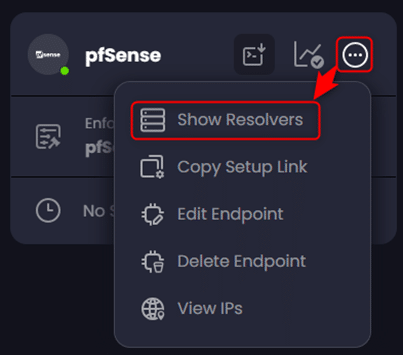
Once we create our ‘pfSense’ endpoint we need to obtain the setup command which includes the ‘Resolver ID’ that will associate our pfSense install with the endpoint and assigned policy we have created. To obtain the setup command, click on the ellipses in the circle, which is the right-most icon on our endpoint, then click on ‘Show Resolvers’:
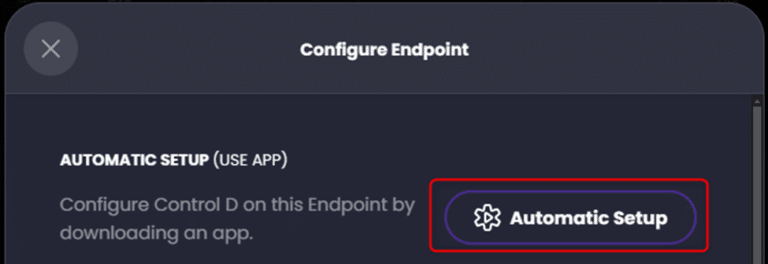
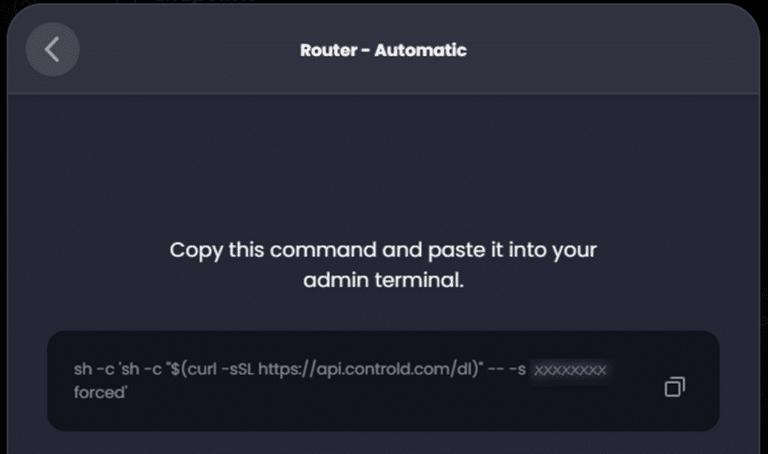
Now click ‘Automatic Setup’ and copy the resulting command which will be used at the pfSense shell to install and configure the ControlD Command Line Daemon binary, ‘ctrld’:
pfSense Configuration
ControlD Command Line Daemon Install

SSH into pfSense as ‘root’ and select option #8 for Shell access. We will then execute the following command we copied form our endpoint to download and install the ‘ctrld’ command line daemon binary (where ‘XXXXXXXXXX’ will be the actual Resolver ID):
sh -c 'sh -c "$(curl -sSL https://api.controld.com/dl)" -- -s XXXXXXXXXX forced'
To confirm it has been installed and configured as expected execute ‘ctrld status’ at the pfSense shell. It should indicate the service is running:


Ensuring Unbound is Disabled in pfSense
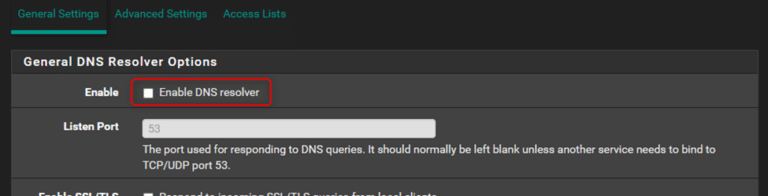
Since this tutorial focuses on a simple configuration where ControlD is our only DNS resolver, we will disable Unbound (the default DNS resolver under pfSense) so that it will not try to start upon reboot. In the pfSense webGUI navigate to ‘Services > DNS Resolver > General Settings’ and uncheck ‘Enable DNS resolver’ then ‘Save’ and ‘Apply changes’:
Force LAN Clients to Use ControlD

If we end the configuration at this point, there is still the possibility of smart teenagers or smart LAN devices bypassing ControlD DNS and attempting to use their own DNS services to work around our blocking rulesets which would disallow their access to undesirable domains or activities like sharing our personal data (smart TVs and Amazon Fire/Echo devices are notorious for this).
To prevent this and force all LAN clients to use ControlD, we will need to add some Port Forward, Outbound NAT, and Firewall rules. We will navigate to ‘Firewall > NAT > Port Forward’ and click ‘^Add’ to add a rule which intercepts any outgoing DNS request on standard DNS service port 53 and redirects that to the ‘ctrld’ daemon:
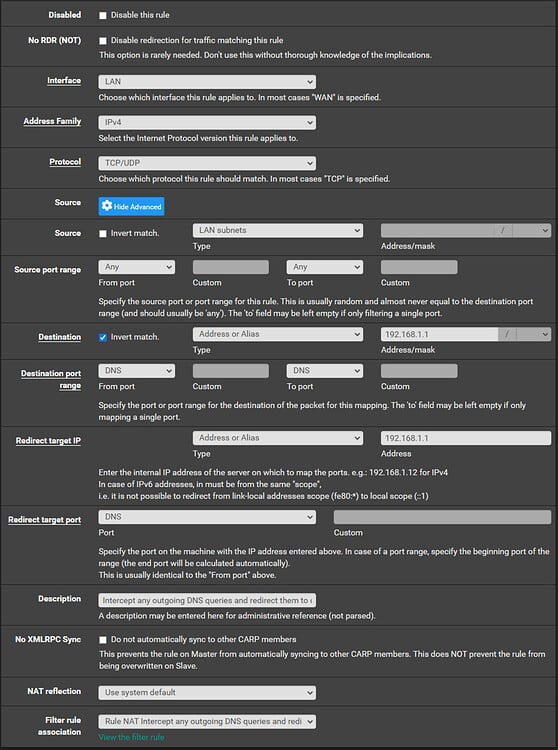
We will then click ‘Save’ on this rule and add one more above this rule to prevent any potential with this interfering with pfSense’s own DNS requests:
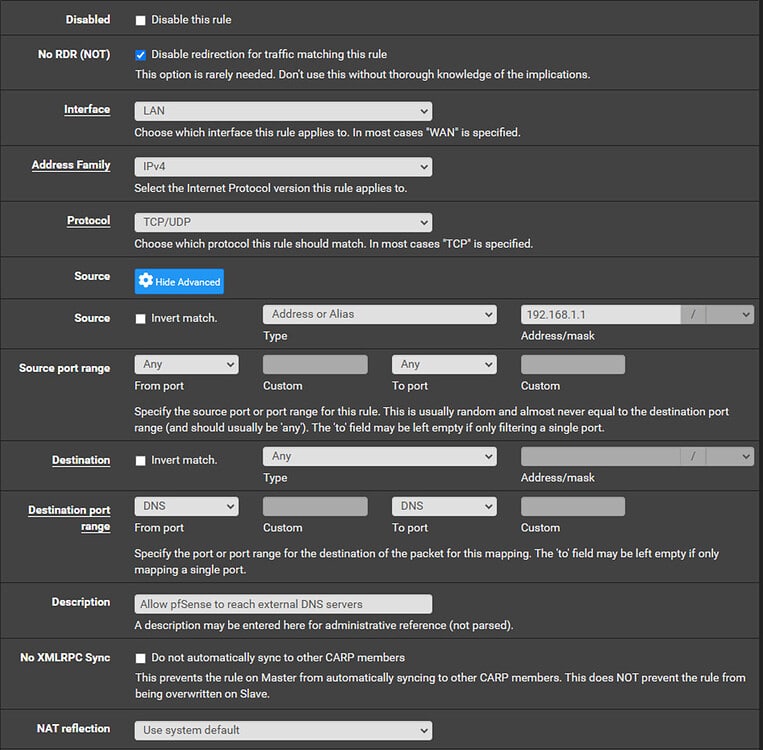
We will then click ‘Save’ on this second Port Forward rule and then ‘Apply changes’.
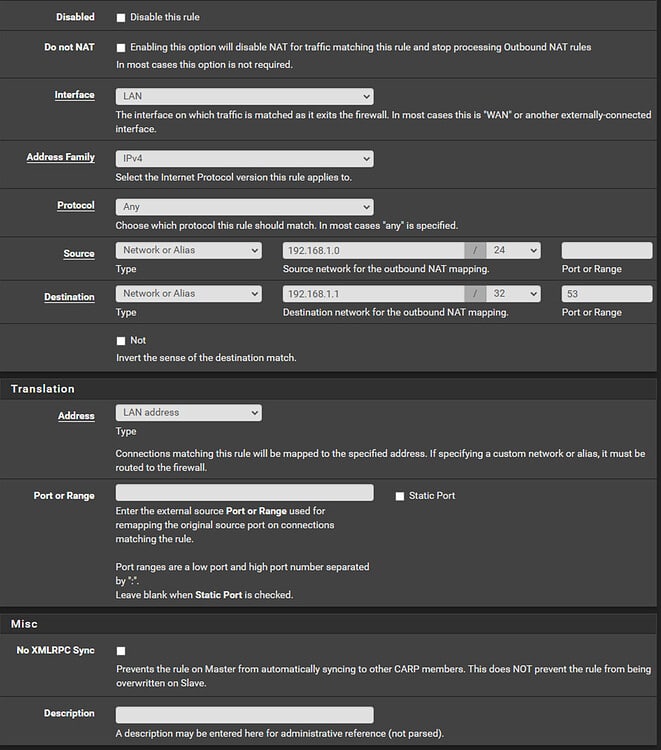
With the DNS Port Forward rules in place, we will now add a manual outbound NAT rule to ensure that any smart devices with hardcoded DNS settings do not receive any ‘unexpected source’ errors when transparently being redirected to ControlD resolvers. Start by navigating to ‘Firewall > NAT > Outbound’ and setting ‘Outbound NAT Mode’ to either ‘Hybrid Outbound NAT rule generation’ or ‘Manual Outbound NAT rule generation’ (it would not be possible to create any manual outbound NAT rules if the mode is set to the default ‘Automatic outbound NAT rule generation’).
Click ‘^Add’ and create the following rule:
To combat newer smart devices which attempt to use encrypted DNS resolvers over ports 443 (‘DNS Over HTTPS’, a.k.a. ‘DoH’) and 853 (‘DNS Over TLS’, a.k.a. ‘DoT’), we will create a new Firewall Alias which points to a list of common, public DNS resolvers, then create an accompanying Firewall Rule which blocks access to those hosts on port 443. First, navigate to ‘Firewall > Aliases > URLs’ and click ‘+Add’ to add the following alias:
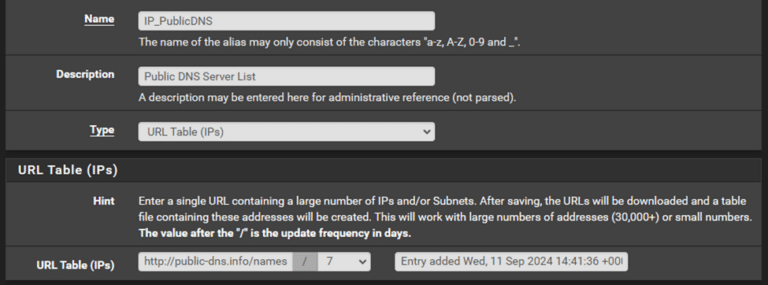
(The full URL Table address should be: http://public-dns.info/nameservers-all.txt 1 )
Click ‘Save’ and ‘Apply changes’. Now we can add the accompanying firewall rules by navigating to ‘Firewall > Rules > LAN’. Click ‘^Add’ to add our first rule for port 443:
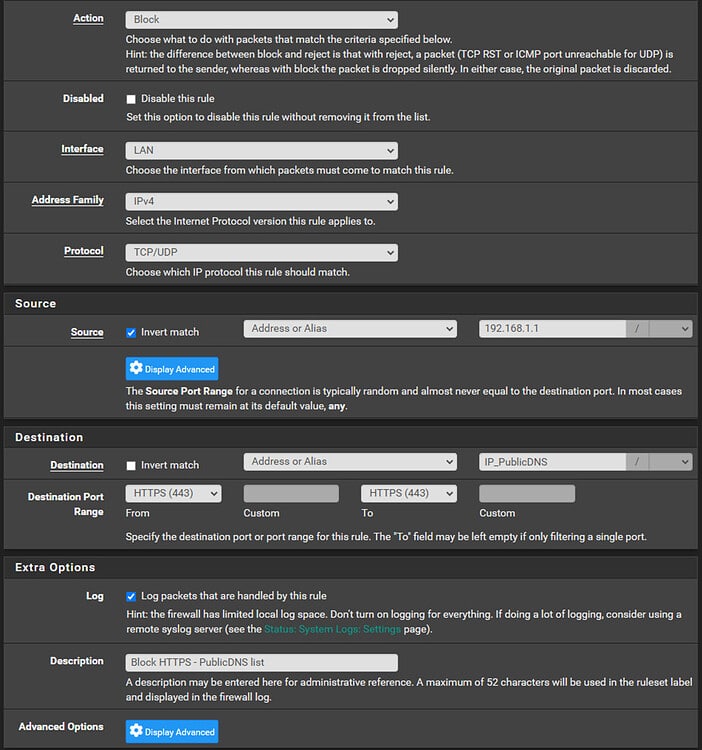
Click ‘Save’ to save the rule, then from the rules list, click the ‘Copy rule’ button to add our rule for port 853:


Click ‘Save’ then ‘Apply changes’.

Testing Firewall Rules in pfSense
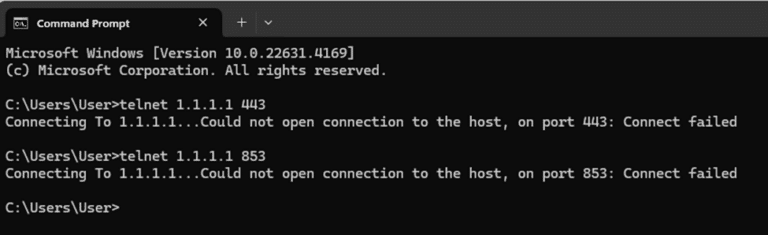
From a local LAN device, we can first try to ‘telnet’ to CloudFlare DNS servers (‘1.1.1.1’) on port 443 and 853 as a way to ensure that such traffic is blocked. The ‘telnet’ tests should timeout after some time:
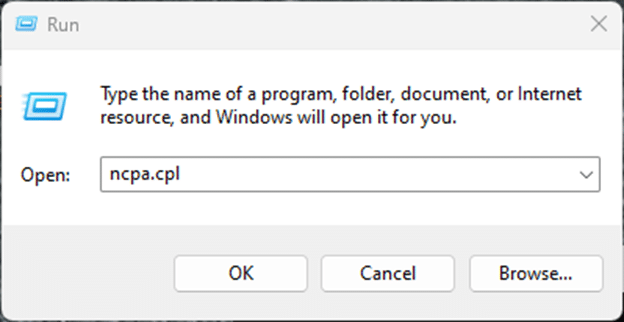
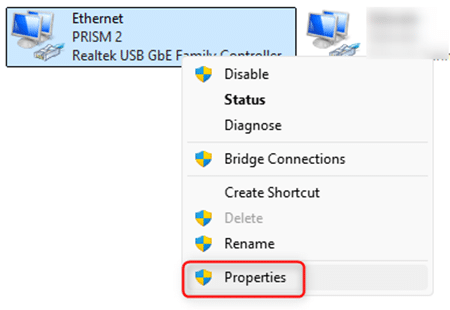
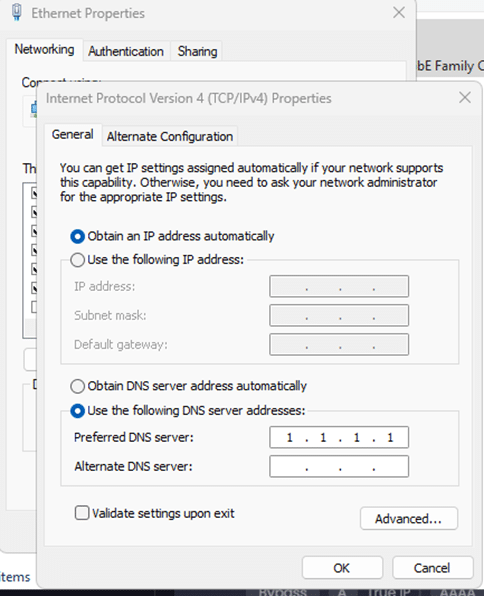
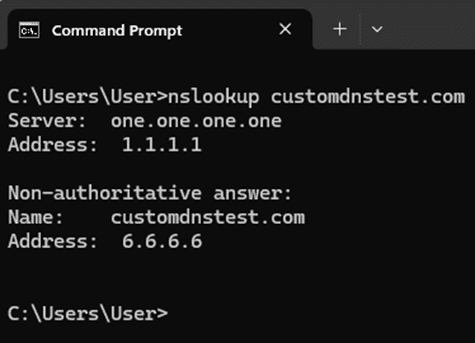
To validate that standard DNS port 53 traffic is being redirected to ControlD, we can create a Custom Rule under the ControlD portal for our ‘pfSense Default’ policy which associates a test domain of our choosing with an IP address of our choosing, then set a client PC to use a public resolver (like CloudFlare, Google, etc.) and perform an ‘nslookup’ or ‘dig’ on the test domain from this client to ensure it resolves to the IP we set it to (Windows 11 ‘nslookup’ example below):

Assignment of Additional Policies to Specific Clients
Once we have pfSense configured to use ControlD for its DNS resolver, it will automatically discover all the clients making DNS requests to the ‘ctrld’ daemon running under pfSense. If you have some specific clients that will have unique needs and should not be subject to our ‘pfSense Default’ policy restrictions, we can add these clients as new endpoints and assign more appropriate policies to them.

Adding Discovered Clients as New Endpoints
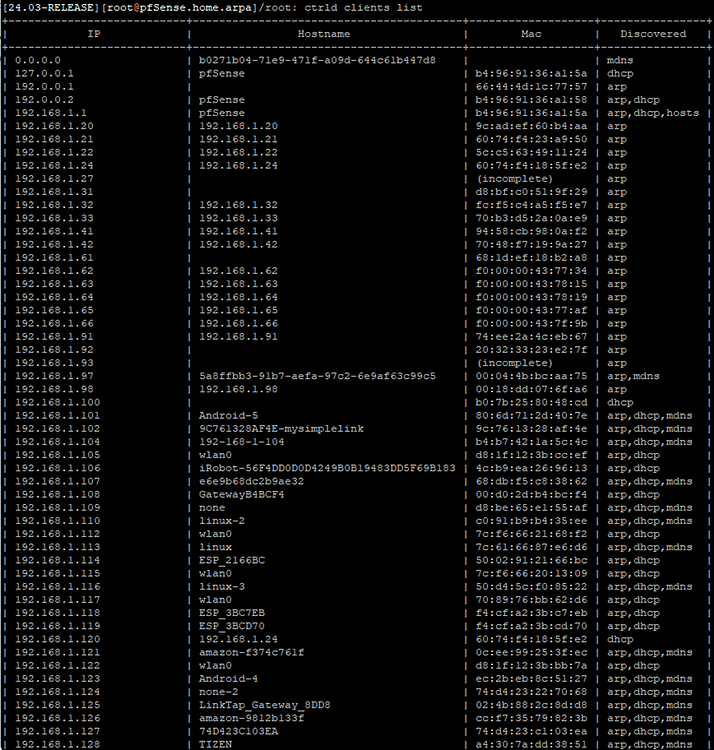
You can get a list of discovered clients (along with how they were discovered) from the pfSense shell by executing ‘ctrld clients list’:
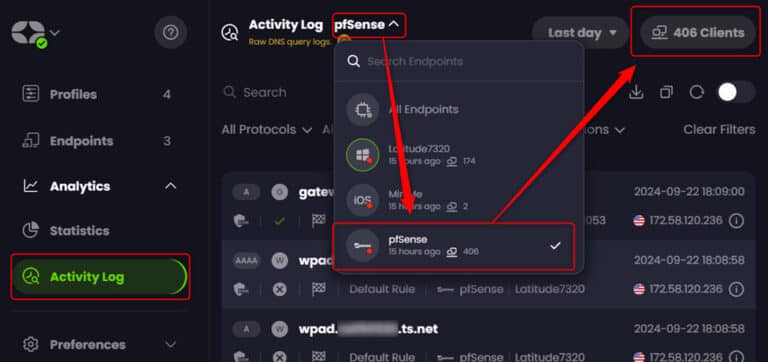
You could use the ‘Hostnames’ field of this output to manually find and create the desired endpoint(s), but there is a much easier way from the ControlD web portal. If you click activity log, then select the dropdown option for ‘pfSense’ you can then click on ‘Clients’ for an easy, searchable list of hosts:
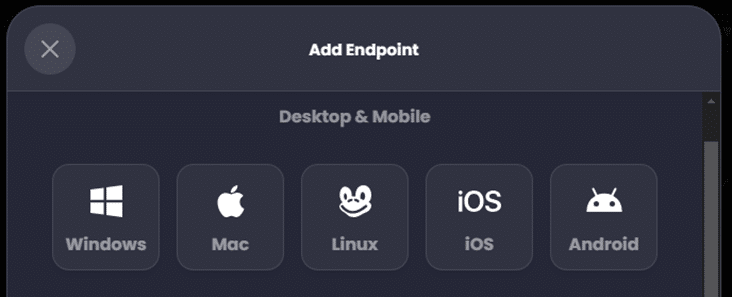
Once you search for and find your desired client you can then simply click on the ‘Create Endpoint’ button:
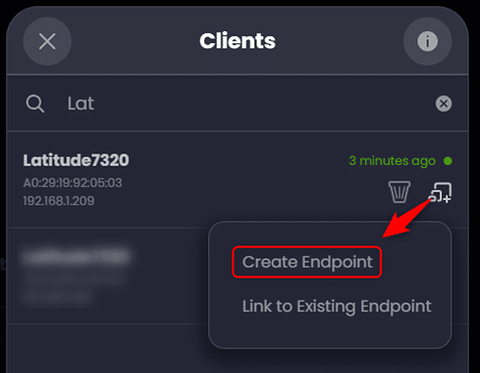
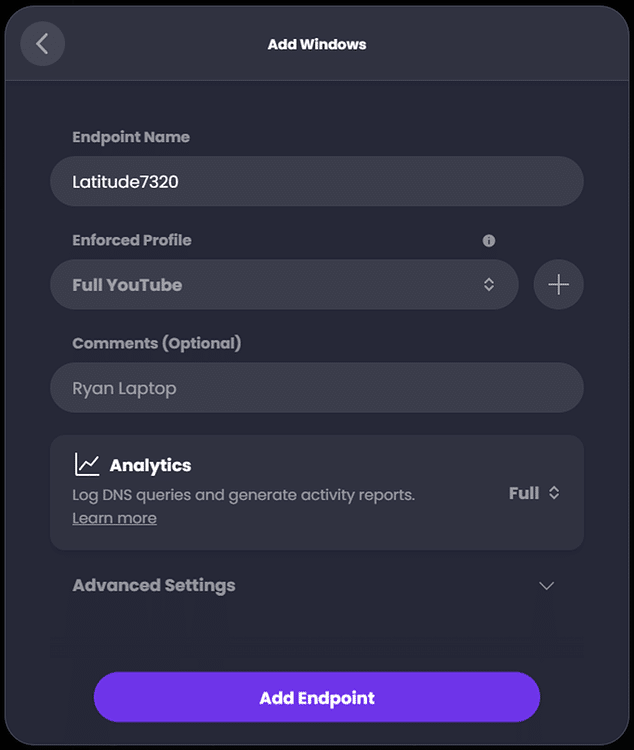
Select the operating system, then name the profile and assign the desired profile. In this case I had already created a separate policy named ‘Full YouTube’ which provides my laptop unrestricted access to YouTube:
Linking Duplicate Clients

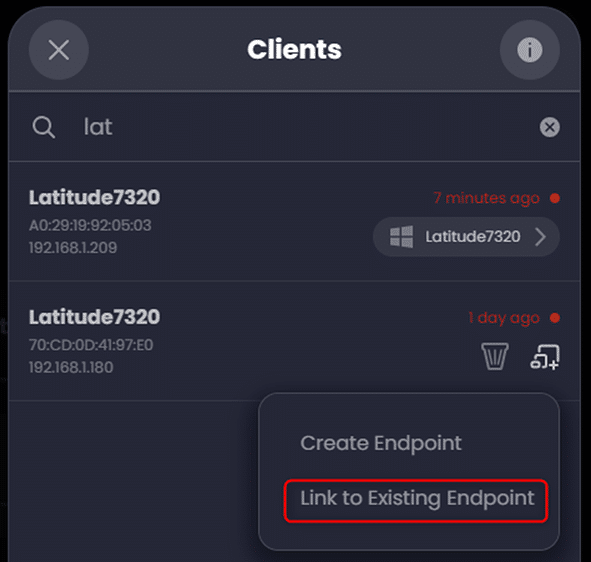
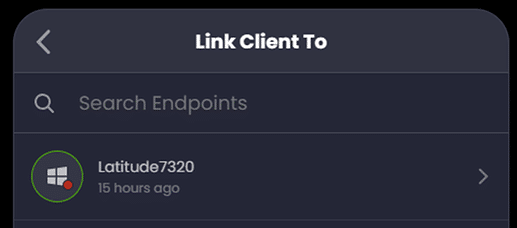
Sometimes you may see the same client listed multiple times due to it accessing the network via multiple interfaces (ex. both Wi-Fi and Ethernet). We can link these separate client entries to the same endpoint so no matter how they connect on our LAN, they will have the same policy applied:

Preventing Duplicate Clients
If you observe more than one duplicate entry for a client this may be due to modern operating system security enhancements which randomize the MAC address of a device’s network interfaces under certain situations or at regular intervals. For simplicity it will be helpful to turn off the MAC randomization feature for your home Wi-Fi network which connects through pfSense to keep the number of duplicate clients to a minimum. See below for how to deactivate MAC randomization on various device types:
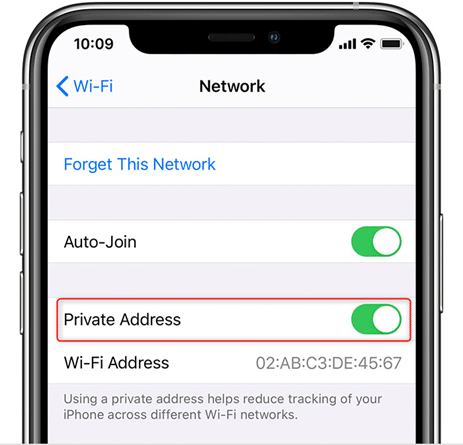
iOS/iPadOS
- Navigate to ‘Settings > Wi-Fi’
- Tap the ‘i’ in the blue circle next to your connected home network
- Toggle ‘Private Address’ to the off position
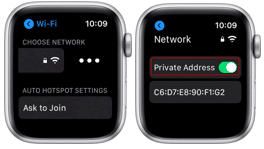
watchOS
- Navigate to ‘Settings > Wi-Fi’
- Tap the name of your home network, swipe left on it, then tap on ‘…’
- Toggle ‘Private Address’ to the off position
macOS (Sequoia or later)
- Navigate to ‘Apple Menu > System Settings’, then click ‘Wi-Fi’ in the sidebar.
- Click the Details button or More Info button next to the network name.
- From the menu next to Private Wi-Fi Address, choose Off.
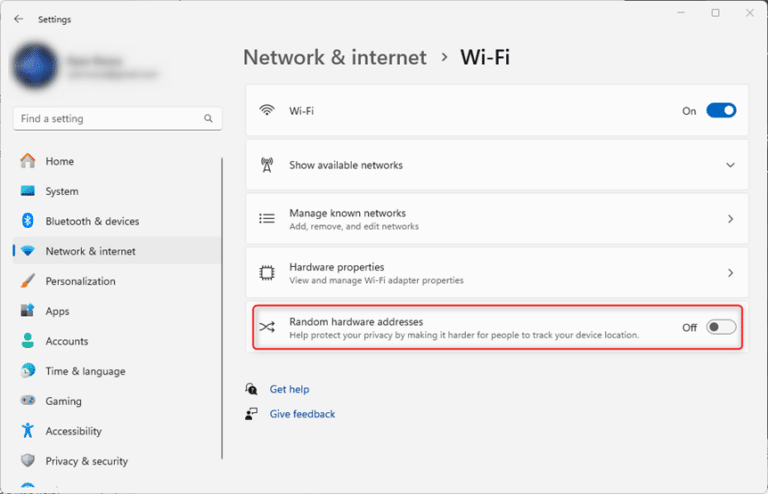
Windows 10/11
- Navigate to ‘Settings > Network & Internet Settings > Wi-Fi’
- Toggle ‘Random Hardware Address’ to the off position
Google Pixel
- Navigate to ‘Settings > Network & Internet > Wi-Fi’
- Connect to the Wireless network in your area
- Tap the gear icon next to the current connection
- Select ‘Advanced’, then ‘Privacy’
- Select ‘Use device MAC’
Samsung Galaxy
- Navigate to ‘Settings > Connections > Wi-Fi’
- Select your home Wi-Fi network.
- Tap the gear shaped icon next to the network you connected to
- Select ‘Advanced’, then ‘MAC Address Type’
- Select ‘Use Phone/Device MAC’
Questions About Protecting Your Internet Experience Using ControlD & pfSense?
For an extensive archive of knowledge base articles, including the ability to comment on this article, visit the InvisaGig forums!